
Maintenance and repair · Revised 14 September 2026
A small split in the surface and a finger that no longer holds its position may look like related problems. They need different decisions. Before buying repair glue, identify what has failed, which material surrounds it and whether the repair would require opening the body.
A minor surface tear may be a candidate for a manufacturer-approved repair. A loose joint, exposed wire, unstable foot or electrical fault needs model-specific assessment first. Don’t cut into the body to investigate, and don’t choose an adhesive from the doll’s appearance alone.

Choose the repair route before choosing a tool
Stop moving the affected part and place the doll in a supported position permitted by its care instructions. For a powered model, switch it off and disconnect its charger before any inspection. Don’t repeat a movement just to demonstrate the fault if it increases the opening or leaves the doll unstable.
| What you observe | What to record | Next step |
|---|---|---|
| A small surface split | Location, approximate length and a close-up at rest | Confirm the material and approved repair method |
| Wire or another hard part visible | Photograph without pulling the opening apart | Stop handling that part; request repair assessment |
| A joint loses its position | Which joint, when it started, and whether there was an impact | Request instructions for that exact skeleton |
| A foot fitting moves or feels unstable | View of the sole and visible fittings | Stop standing the doll; confirm the fitting design |
| Heat, charging or powered movement behaves abnormally | Model, power supply label and visible error indication | Keep it powered off and seek technical support |
This is an editorial sorting checklist, not a diagnosis from a photograph. Its purpose is to keep a cosmetic repair from being used to conceal a structural problem. Glue on the outside cannot confirm that an internal joint is secure.
Identify the material at the damaged area
Look at the order specification, not just the product name. A doll can have a silicone head and a TPE body. In that case, a product described as suitable for the body is not automatically suitable for the face. Accessories, painted surfaces and internal components may introduce further differences.
If the listing has changed since purchase, send the order number and saved specification to support. A current photograph may represent another configuration. Our TPE and silicone comparison explains the broader material distinction; it cannot identify your particular damaged part.
Adhesive documentation illustrates why this matters. Irontech’s TPE repair glue is explicitly presented for TPE skin. Smooth-On’s Sil-Poxy documentation describes applications with specified silicone rubbers and recommends testing suitability when uncertain. Neither page certifies a universal adhesive for every doll.
Our recommendation is to obtain approval for the exact combination: damaged component, surface material and repair product. Ask separately about painted areas and any area that will have intimate contact. A general claim about bonding silicone or contact with skin is not enough to establish every intended use.
Before repairing a surface tear
Start with a clear photograph before adding oil, powder, stain remover or adhesive. These products serve different purposes. Applying several while trying to discover what works also makes it harder to explain the condition to the manufacturer.
Check whether the split rests closed or opens during an ordinary permitted pose. Don’t stretch it to measure its depth. A small opening beside a moving joint deserves more caution than its length suggests, because the same movement may continue to load the area after a repair.
Once the manufacturer confirms that a home repair is appropriate, ask for a written sequence covering these points:
- The cleaning method for the exact material and finish.
- The named repair product, its usable condition and any required compatibility check.
- How to position and support the part during the repair.
- The application method and amount for this damage.
- The full curing requirement and conditions before movement or contact resumes.
- How to judge an unsuccessful result and who to contact.
The instruction to wait “a few minutes” is not a substitute for a curing requirement. Some adhesive documentation distinguishes the point at which parts can be handled from full cure. Follow the instructions supplied for the approved product rather than borrowing a time from another glue or a short video.
Don’t improvise with a clamp that presses directly into the body, add a household adhesive because it dries quickly, or apply a heated tool based on appearance alone. A repair recording may omit preparation, the material formulation or the operator’s equipment settings. Those omissions matter more than how smooth the final seconds look.
Fingers, joints and standing feet need their own assessment

A finger problem can involve the surface, its internal support or both. Record whether the issue is visible damage, a change in position-holding or a hard part near the surface. Avoid repeatedly bending the finger to prove the problem. If wire is exposed, don’t push it back through the opening and seal over it.
With a loose arm, knee or neck joint, the missing information is often the skeleton design. A screw that is accessible on one model may be enclosed or absent on another. We do not recommend cutting an access hole. Ask for the correct service route before any incision, disassembly or attempt to force a limb back into position.
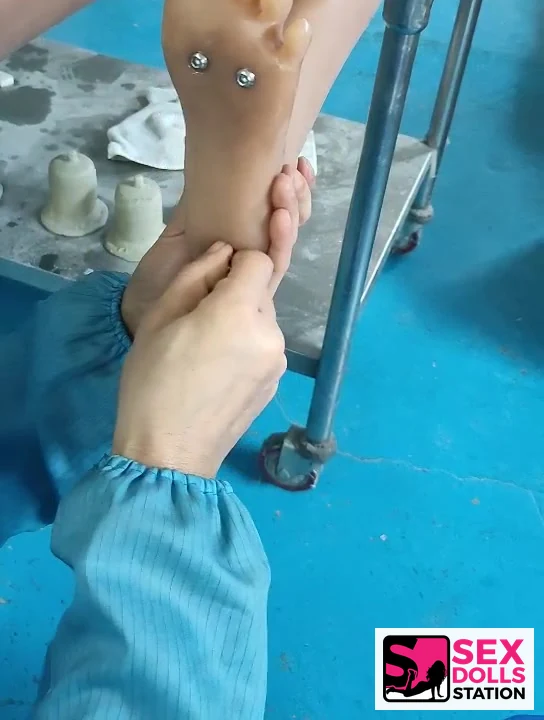
Standing feet also vary. Visible bolts do not tell you whether a fitting should rotate, how it connects internally or which tool is appropriate. If the foot becomes unstable, stop using a standing pose. Send a photograph of the sole and the exact model instead of guessing a tightening direction or torque.
The supplied repair clips are useful because they show that these are separate work areas. They do not provide a confirmed match between the demonstrated components and every product in our catalogue. Powered features add another reason to avoid opening a body without model-specific guidance: the exterior does not show where internal equipment sits.
Prepare a support request that can be assessed
Use the contact page to explain the issue and ask how to send supporting photographs. Keep order details and private images out of public product reviews. If a photo contains a shipping label, cover personal information that is not needed for the assessment.
Repair request template
Order number and model:
Damaged part and confirmed material:
When the issue first appeared:
Any impact, unusual resistance or powered fault:
Products or repair attempts already used:
Photos available: overall location, close-up and specification label.
Please confirm whether this can be repaired at home, the approved materials and the exact instructions.
For the location photo, include enough of the surrounding part to show orientation. For the close-up, use steady lighting and focus on the opening or fitting. Keep the part supported in the same position between shots. A ruler beside the area can indicate scale without being pushed into the split.
Describe observations separately from guesses. “The left knee no longer holds the same angle” is more useful than “the bolt is broken” when you haven’t seen the internal part. If a previous repair was attempted, identify the product used and share its packaging label. That information can change the next recommendation.
Check the result without stress-testing it
After the specified cure and any manufacturer-required waiting period, inspect the area at rest. Compare it with the original photograph. Look for a reopened edge, a change in shape, residue or an internal part pressing against the surface. Don’t pull on a repaired seam to prove that it is strong.
A neat surface is only one part of the result. If an underlying joint still moves incorrectly, cosmetic closure hasn’t resolved that issue. If the split reopens, pause and return to support with new photographs rather than applying additional layers repeatedly.
Keep the repair instructions, product label and date together. For continuing upkeep, use the care guide. Routine cleaning advice should not replace special instructions for a repaired area, especially while the finish or permitted movement remains under review.
Common repair questions
Can the same glue repair TPE and silicone?
Don’t assume it can. Obtain confirmation for the actual material and component. A hybrid doll can require different guidance for its head and body.
Can I follow the tool movements shown in these pictures?
No procedure is established by a still image. These selected frames illustrate inspection areas; the material, equipment settings and compatibility remain unconfirmed.
Should I cut the skin to reach a loose joint?
Not on the basis of a general guide. Get model-specific assessment before opening the body. Keep the affected area supported and avoid forcing it.
Will a repaired area look completely invisible?
We can’t promise that. The damage, material, finish and method affect the result. Ask about realistic appearance and permitted movement before proceeding.
Product specifications to compare before ordering
If you are still choosing a doll, examine the stated body material and ask which maintenance instructions are supplied. These two CLM Classic listings identify TPE bodies. They are catalogue references, not examples of damaged products or proof that the illustrated repairs apply to them.
 Joanna 165cm · CLM Classic
 Bonnie 165cm · CLM Classic
Editorial basis: current catalogue specifications, the two linked manufacturer documents and selected supplied repair-video frames reviewed on 14 September 2026. No repair was performed or compatibility test claimed for this article.
